Sunday, October 30, 2011

binding with Billy

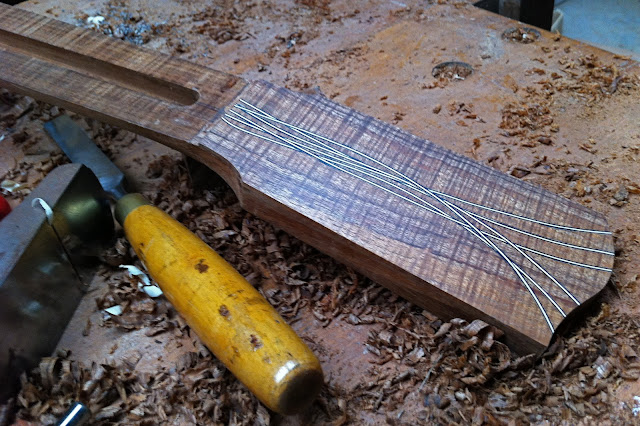
These are the headstock bindings, in the raw, straight off the scraper so don't look too closely, there will be some cosmetic magic before the varnish goes on. The bindings are maple, with a purfling base, and they are the same as the ones I'll be putting on the corpus of the instrument as soon as I've done some proper work...
You're putting it on with tape? Let's get out of here, I need to check the lamp post...


Another piece? Come on, a man could bust here, and all you can do is play with that scraper.


not sailing indoors


It was a privilege to be invited by the Colac Woodworker's Guild, to bring a few bits and pieces to contribute to their Wood Design exhibition at the Colac Performing Arts centre in the Western part of our rural region. The most wonderful aspect of the experience was the personal interaction with and between club members, and their determination to work so happily and inclusively together to pull off an inspirational showcase of local talent...but thrillingly, it provided a platform to highlight the beauty of local timbers too.

two of my babies


  the space was huge and beautifully, theatrically lit


Hundreds of locals spent time enjoying the work throughout the two day show. These pics do very little justice to the range and quality of work.
Oh, and can you believe it? Some guy put a sailboat in the middle of the floor....

Thursday, October 27, 2011

a little bit of neck work on the side


With some family encouragement I decided on this headstock cover and have attached it to the head.


Neck work began with a chisel to rough out the heel, then finer paring then planing, spokeshave and a bit of sculpting with a rasp to feel the form. Then back to planes and scrapers. The neck can't be too finely shaped yet, as there are fingerboard and truss rod and neck/body joint issues to attend to first.


Sunday, October 23, 2011

plane talk about small tools


 Several readers kindly showed interest in reading more about these little tools, so I'll expand a bit here about their development. They are imperfect things made from necessity, so please don't think that I describe them here for any purpose other than a sharing of my limited experience.
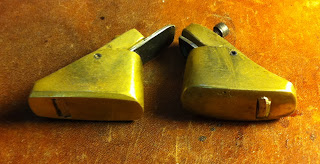
 Above and below is where it all started, and these haven't seen the light of day for a long time, and haven't been used since the improved design was produced. My thinking behind these first tries was that the block plane, with its low blade angle, was easy to use on difficult timbers, and I had plenty of that to deal with. They worked well, but weren't any more comfortable than the commercial ones which I could not justify purchasing  at the time due to cost and guilt.

These are one piece of brass for the body, simply folded to become a cradle for the beech wood infill. At the top of the pic above are some bits of blade steel that I have butchered to make blades for these planes.

The point that I missed in these first designs was that a block plane's low angle differentiates itself significantly from a bench plane in having a low centre of gravity, and ease of use with one hand. These are not factors that need consideration in a mini plane. The fact that the bevel is facing upwards in a block plane means that the cutting angle is much higher than would be expected.


So my next design exercise was to take my desired cutting angle (I can't remember exactly the number I settled upon) and design a plane that could :
1. provide some mass to absorb heat.
2. be easily steered with thumb and forefinger and propelled by the second finger from behind.
3. be modifiable for flat or curved bottom shape.
4. be manufacturable by a klutz like me with no real training in these things.

In this shelf unit there are a few ring-ins. Top left and bottom middle are Ibex planes that I bought since doing all this making, just to see if they were any better than mine. They are cheap and very well made- much better made than mine, but they don't work as well, in my hand, anyway. I would recommend them to anyone unable to make their own. I just find them a little bulky and uncomfortable.

 The first of my new design were fabricated from sheet brass again, but without a wooden infill. Jointing was with silver solder. In the photo above the middle two in the top row and the left hand two in the second row are made in this method.

 But then, other people wanted them because they were so handy and portable, but fabrication was way too slow without charging people a fortune, so I wanted to cast some. The pic below if of the most useful of these. This one has a screw for the cap tightening, while some others use a cheese-headed screw. The cheese-head screw might look sexier, but the ordinary one is nice because I can tighten it merely with a twist of the thumb nail.
 The pic above contrasts the same cast plane in two versions- flat and convex bottoms. These ones have rolled tubes as pivot pins for the cap, but early ones had an ordinary nail in there for that job, cut and peened at each end.

The pic below left is of the group that I find most useful, while on the right the underside shot shows the folded and soldered construction of a fabricated one.


Below left is one of the plates of patterns which were placed face down in green sand for casting. The models are made from wood, and the method of manufacture explains why the cast ones have a slightly heftier shape than the fabricated ones. In order to make a successful pattern, the shape has to be tapered away from the plate, or it can't be removed for casting without ruining the impression left in the sand.


Above right, a collection of cast blanks in various stages of finish are waiting for a new life in the wood transformation business. My thinking was that a few spare castings would make it easy for me to continue to develop shapes and ideas, but me being me, as soon as the problems were solved, I lost interest and went off on another spurious adventure, looking for things that I can't do yet.

But I might add (somewhat revealingly) that this behaviour was a direct consequence of a determination to make a more creative life, having nearly lost the one I had. These  were to be the tools of my reconstruction.

When I was at art school at the start of the 1970's, we did life drawing for four hours every week for four years as part of the practical side of the course. The academic side of the course was equally stimulating. In life drawing, the emphasis was on learning to see, but perceive is a more accurate word, and the gestures of the arm and the hand were linked in the brain to the eyes. To describe a form freely we would carve away at the cheap butcher's paper with the charcoal, describing edges with repeated gestures until the shape formed on the page. Hesitant shapes would firm up through repetition and confidence, with the result that an edge would be made from many exploratory lines.

Using these little planes is very much like drawing this way. That is why I find them so satisfying. When you want to reveal a harmonious curve, or a transition (as on the heel of an instrument neck), the plane is the charcoal, linking the brain through the gesture in finding the edge,  volume or  shape. A larger plane removes a flat wide swathe, but these remove long thin ones, so there are lots of arm repetitions and gestures which allow you to feel the shape becoming more refined. The thin line also removes difficult timber with less tear out and resistance.

Did I ever mention that I love nice lines?

Thursday, October 20, 2011

feeling edgy


Now, if you were being paid by the hour, or if you were particularly bound up in being efficient then the overhang of the soundboard would be removed by a flush trim router set-up. But if you can afford the luxury of trying to work nicely instead of only aiming for efficiency, you may be surprised, after a few years, how small a difference it makes in time, and how much more suitably you can spend the time available.

I'm not against the use of machines, and I'm certainly not a purist who advocates any sort of un-thinking rigidity. I have lots of machines, and sometimes I'm quite lazy. But I do try to add value to as many tasks as I can, to make the experience one that has an accumulative effect on my skills, and one that is as memorable and meaningful as possible.

I can't tell you what pleasure I find in using this little plane. It was one of the first that I made, and I've used it so often and it has served me so well that it only took maybe fifteen extra minutes to remove the overhang with it than it would have taken with the router.

 The two experiences would have been so utterly different. The router would be very noisy and dusty, the set up time would be as long as the time to do the job, and there would be tension in the room because a mistake with a machine happens very quickly and with a lot more possible consequences. But the real reason I chose the plane in this instance was because I wanted to do something pleasurable.

This particular plane was the first I made to my new design in 1993. It was fabricated from sheet brass, folded and silver soldered at the joints. The blade is made from a cut and ground portion of a used power hacksaw blade- being fine grade high speed steel. It holds an edge remarkably and has been doing so for nearly twenty years. Some of the other planes were made from cast bronze. There is a picture of a few of them in my first post here. If there is interest I can expand the information on these.


 In the narrow and tight curve of the waist, a chisel and knife, cutting obliquely, and always going 'downhill' on the grain can take the edge flush. The sides have then had a bit of a scrape to make the wood feel alive and fresh and eager to meet the world.


 The corpus has been out of the mold for inspection, but is back in there for support while edging.


Wednesday, October 19, 2011

topping along

 There are lots of ways to glue the top of an instrument on. The clamps I use for violins are very specialised for quick clamping because using hot hide glue over the entire surface of both components is challenging at speed....with absolute accuracy. With that glue there is no time for adjustment before it gels.

For guitars, some people use elastic substances- cords, tapes etc- hooked over screws on the sides of the mold, backwards and forwards over and over to cover the surface. Some people use dozens of individual spool clamps, while some use a curvable plate overlapping the top by a margin big enough to screw it down.

What I did here was more akin to the last example than to the others. If the top fits all the way around, without wayward bits that have gaps, then very little pressure is required to clamp it. You really only want the minimum of pressure needed to squeeze out excess glue because the top should want to sit exactly where you put it. I used 50mm bugle headed screws in a battery driver with the clutch set carefully to slip on very little pressure to make sure I didn't get too enthusiastic with the tool.

If I decide to make more guitars I might make a more formal arrangement than the separate pieces in the pic above. I may have to anyway for the back, which has much more fore and aft curve, particularly at the top of the long arch.
The little blocks on the inside of the mold are there to hold the sides about 20mm above the top of the mold, against the clamping pressure. This view from underneath is a luxury that won't be available when the back is glued on. I can check whether the linings and blocks are actually pressed to the plate, but that won't be possible next time. So, I've already dry fitted the back with temporary clamps to reassure me that the fit is good, and I know when I glue the back on 'blind' that it should be all good in there.

Monday, October 17, 2011

you want curves?

 Picture a large orange or a grapefruit. Now imagine drawing the outline of a guitar body on the surface of the fruit. Now imagine cutting the outline and peeling away the guitar body top. If it holds its shape it will approximate the spherical nature of some guitar archings- often with a radius over twenty feet. Others, like mine aren't actually based on a radius, but on a curve more like the boatbuilder's 'fair curve', or a violin's arching.

The sides of this instrument taper by about 15mm from maximum height at the widest point of the lower bout. This reduction in depth has to accommodate the curve of the back, so the blocks and the outline have quite a subtle and complex path to follow as they make their way around the instrument.

You can see from the angle above that at the narrow waist, the sides need to get higher as they head inwards. It takes a little care.

After the sides are pretty much shaped, the bottom kerfings can be glued in. They are complex too because their journey involves some curving down as well as in and out.

Saturday, October 15, 2011

taking headstock

One of the things that I won't do on this guitar is to make an abalone name plate for the headstock. I mean, abalone is nice, but I'm not a believer in wearing brands, and I certainly don't want my name at the top of a hand made article. If someone wants to find out who made it they can look inside. Branding is for products. I don't make products.


 The one on the right is one of three or four options that I'm considering for this guitar. I want a lyrical headstock that befits the top of a nice instrument. One that speaks of the things I love in the arts; lines, organic shapes, timber and the reflex curve. Here, the six lined version (current shape) sits to the right of a computer image of the same thing when it only had five lines. I was hoping that the six serendipitous lines would contrast nicely with the straight sharp lines of the strings going from nut to tuners. The lines are inlaid 3 piece purfling. It will look better, that is stronger and more cohesive, when it has been polished.


 Above here is another possibility, a book-matched pair of off-cuts from the back wood. Being so busy visually, I'd leave that completely un-adorned if I choose to go with it for this instrument.


Plan C is to make the headstock out of ebony to match the fingerboard.

I have some evaluating to do.